Before running a multi-node Kubernetes cluster on my Raspberri Pi cluster I wanted to play around with the different deployments and possibilities. For that I was looking for an easy-to-use tool to spin-up a couple of virtual Linux machines as Kubernetes nodes.
Multipass
![]() The easy-to-use tool I found was Canonical’s Multipass. Much easier to use than VirtualBox or VMware Fusion. Downloads are available for Windows, Mac and Linux and the installation is very straightforward. The only “limitation” is that it only supports Ubuntu images.
The easy-to-use tool I found was Canonical’s Multipass. Much easier to use than VirtualBox or VMware Fusion. Downloads are available for Windows, Mac and Linux and the installation is very straightforward. The only “limitation” is that it only supports Ubuntu images.
Installing Kubernetes
 In this setup k3s is installed on 3 virtual Ubuntu machines. By default an older version of Traefik will be installed. This will probably change in a future version but for this installation a newer version of Traefik is installed manually.
Create three virtual machines
Once multipass is installed creating virtual machines is just one command.
multipass launch --name k3s-master --cpus 2 --mem 4096M --disk 4G
multipass launch --name k3s-node1 --cpus 1 --mem 2096M --disk 3G
multipass launch --name k3s-node2 --cpus 1 --mem 2096M --disk 3G
Verify that the three machines are running
mutlipass list
The output should look something like the text below, take note the IP-address of the ‘master’
Name                    State             IPv4             Image
k3s-master              Running           192.168.64.4     Ubuntu 20.04 LTS
k3s-node1               Running           192.168.64.5     Ubuntu 20.04 LTS
k3s-node2               Running           192.168.64.6     Ubuntu 20.04 LTS
Update the base OS
Run on all three virtual machines
sudo apt update
Followed by
sudo apt upgrade
Reboot
sudo reboot
Install k3s on the master
Open a shell to the master via the cli (‘multipass shell k3s-master’) or the Multipass menu (k3s-master/Open Shell). Traefik will be installed separately ("–disable traefik").
curl -sfL https://get.k3s.io | INSTALL_K3S_EXEC="--write-kubeconfig-mode 664 --bind-address 192.168.64.4 --advertise-address 192.168.64.4 --disable traefik" sh -
Note: INSTALL_K3S_EXEC="–docker …" on the Ubuntu host resulted in: The connection to the server 192.168.64.4:6443 was refused - did you specify the right host or port?
Get the server token from the ‘master’
sudo cat /var/lib/rancher/k3s/server/token
Install k3s on the nodes
On the nodes 1 & 2:
Add the ‘NODE_TOKEN’
export NODE_TOKEN=K10...bf5::server:302...482
Install ‘k3s’ and join the cluster
curl -sfL https://get.k3s.io | K3S_TOKEN=${NODE_TOKEN} K3S_URL=https://192.168.64.4:6443 sh -
Note: INSTALL_K3S_EXEC="–docker …" failed on the master, on the worker nodes it fails to join the cluster.
Result
$ curl -sfL https://get.k3s.io | K3S_TOKEN=${NODE_TOKEN} K3S_URL=https://192.168.64.4:6443 sh -
[INFO]  Finding release for channel stable
[INFO]  Using v1.18.8+k3s1 as release
[INFO]  Downloading hash https://github.com/rancher/k3s/releases/download/v1.18.8+k3s1/sha256sum-amd64.txt
[INFO]  Skipping binary downloaded, installed k3s matches hash
[INFO]  Skipping /usr/local/bin/kubectl symlink to k3s, already exists
[INFO]  Skipping /usr/local/bin/crictl symlink to k3s, already exists
[INFO]  Skipping /usr/local/bin/ctr symlink to k3s, already exists
[INFO]  Creating killall script /usr/local/bin/k3s-killall.sh
[INFO]  Creating uninstall script /usr/local/bin/k3s-agent-uninstall.sh
[INFO]  env: Creating environment file /etc/systemd/system/k3s-agent.service.env
[INFO]  systemd: Creating service file /etc/systemd/system/k3s-agent.service
[INFO]  systemd: Enabling k3s-agent unit
Created symlink /etc/systemd/system/multi-user.target.wants/k3s-agent.service → /etc/systemd/system/k3s-agent.service.
[INFO]  systemd: Starting k3s-agent
Verify the installation
Check on the master if the nodes have joined the cluster
$ kubectl get nodes
NAME         STATUS   ROLES    AGE    VERSION
k3s-master   Ready    master   104m   v1.18.8+k3s1
k3s-node1    Ready    <none>   112s   v1.18.8+k3s1
k3s-node2    Ready    <none>   102s   v1.18.8+k3s1
Check the ‘kube-system’ namespace if all pods are running
$ kubectl get pods -n kube-system
NAME                                     READY   STATUS    RESTARTS   AGE
metrics-server-7566d596c8-4gjhx          1/1     Running   0          103m
local-path-provisioner-6d59f47c7-sn6tm   1/1     Running   0          103m
coredns-7944c66d8d-wpcmn                 1/1     Running   0          103m
Check the running services
$ kubectl get service -A
NAMESPACE     NAME             TYPE        CLUSTER-IP     EXTERNAL-IP   PORT(S)                  AGE
default       kubernetes       ClusterIP   10.43.0.1      <none>        443/TCP                  105m
kube-system   kube-dns         ClusterIP   10.43.0.10     <none>        53/UDP,53/TCP,9153/TCP   105m
kube-system   metrics-server   ClusterIP   10.43.55.155   <none>        443/TCP                  105m
Access the cluster from the host machine
To acces the cluster from our local machine we copy the configuration file from the server to our local directory.
Copy (“transfer”) the Kubernetes config file to your local machine.
multipass transfer k3s-master:/etc/rancher/k3s/k3s.yaml ./[workingdir]/kubeconfig
The kubectl command line tool lets you control Kubernetes clusters. For configuration, kubectl looks for a file named config in the $HOME/.kube directory. You can specify other kubeconfig files by setting the KUBECONFIG environment variable or by setting the –kubeconfig flag. Overview of kubectl
In the ‘kubeconfig’ file you need to change the server URL to match the external IP-address of k3smaster we found with the ‘multipass list’ command. The sample config from my configuration:
apiVersion: v1
clusters:
- cluster:
    certificate-authority-data: LS0 ... tCg==
    server: https://192.168.64.4:6443
  name: default
contexts:
- context:
    cluster: default
    user: default
  name: default
current-context: default
kind: Config
preferences: {}
users:
- name: default
  user:
    password: 8dd ... b3b
    username: admin
Now you can check the nodes status from your local machine
$ kubectl --kubeconfig ./[workingdir]/kubeconfig get nodes
NAME         STATUS   ROLES    AGE   VERSION
k3s-master   Ready    master   22h   v1.18.6+k3s1
k3s-node1    Ready    <none>   19h   v1.18.6+k3s1
k3s-node2    Ready    <none>   19h   v1.18.6+k3s1
Installing Traefik
Used resources:
- Traefik v2 & Helm - A tour of the Traefik 2 Helm Chart
- K3S & Traefik 2
- Traefik & CRD & Let’s Encrypt
Deploy Traefik 2.2
We will perform this installation without a deployment utility. You can find a helm repo in the first resource link if you want use an automated install.
First, we need to declare our Ingress resource. This resource has specific elements like Middleware, TCP and UDP routes, TLS options, etc.
We will create the definitions for these resources using Custom Resource Definition( aka CRD ).
All these definitions can be found in the Traefik documentation : https://docs.traefik.io/user-guides/crd-acme/
Create the file traefik-crd.yaml
apiVersion: apiextensions.k8s.io/v1beta1
kind: CustomResourceDefinition
metadata:
  name: ingressroutes.traefik.containo.us

spec:
  group: traefik.containo.us
  version: v1alpha1
  names:
    kind: IngressRoute
    plural: ingressroutes
    singular: ingressroute
  scope: Namespaced

---
apiVersion: apiextensions.k8s.io/v1beta1
kind: CustomResourceDefinition
metadata:
  name: middlewares.traefik.containo.us

spec:
  group: traefik.containo.us
  version: v1alpha1
  names:
    kind: Middleware
    plural: middlewares
    singular: middleware
  scope: Namespaced

---
apiVersion: apiextensions.k8s.io/v1beta1
kind: CustomResourceDefinition
metadata:
  name: ingressroutetcps.traefik.containo.us

spec:
  group: traefik.containo.us
  version: v1alpha1
  names:
    kind: IngressRouteTCP
    plural: ingressroutetcps
    singular: ingressroutetcp
  scope: Namespaced

---
apiVersion: apiextensions.k8s.io/v1beta1
kind: CustomResourceDefinition
metadata:
  name: ingressrouteudps.traefik.containo.us

spec:
  group: traefik.containo.us
  version: v1alpha1
  names:
    kind: IngressRouteUDP
    plural: ingressrouteudps
    singular: ingressrouteudp
  scope: Namespaced

---
apiVersion: apiextensions.k8s.io/v1beta1
kind: CustomResourceDefinition
metadata:
  name: tlsoptions.traefik.containo.us

spec:
  group: traefik.containo.us
  version: v1alpha1
  names:
    kind: TLSOption
    plural: tlsoptions
    singular: tlsoption
  scope: Namespaced

---
apiVersion: apiextensions.k8s.io/v1beta1
kind: CustomResourceDefinition
metadata:
  name: tlsstores.traefik.containo.us

spec:
  group: traefik.containo.us
  version: v1alpha1
  names:
    kind: TLSStore
    plural: tlsstores
    singular: tlsstore
  scope: Namespaced

---
apiVersion: apiextensions.k8s.io/v1beta1
kind: CustomResourceDefinition
metadata:
  name: traefikservices.traefik.containo.us

spec:
  group: traefik.containo.us
  version: v1alpha1
  names:
    kind: TraefikService
    plural: traefikservices
    singular: traefikservice
  scope: Namespaced

---
kind: ClusterRole
apiVersion: rbac.authorization.k8s.io/v1beta1
metadata:
  name: traefik-ingress-controller

rules:
  - apiGroups:
      - ""
    resources:
      - services
      - endpoints
      - secrets
    verbs:
      - get
      - list
      - watch
  - apiGroups:
      - extensions
    resources:
      - ingresses
    verbs:
      - get
      - list
      - watch
  - apiGroups:
      - extensions
    resources:
      - ingresses/status
    verbs:
      - update
  - apiGroups:
      - traefik.containo.us
    resources:
      - middlewares
      - ingressroutes
      - traefikservices
      - ingressroutetcps
      - ingressrouteudps
      - tlsoptions
      - tlsstores
    verbs:
      - get
      - list
      - watch

---
kind: ClusterRoleBinding
apiVersion: rbac.authorization.k8s.io/v1beta1
metadata:
  name: traefik-ingress-controller

roleRef:
  apiGroup: rbac.authorization.k8s.io
  kind: ClusterRole
  name: traefik-ingress-controller
subjects:
  - kind: ServiceAccount
    name: traefik-ingress-controller
    namespace: default
Apply the CRD
sudo kubectl apply -f ./CustomeResourceDefinition.yaml
The output
$ sudo kubectl apply -f ./traefik-crd.yaml
customresourcedefinition.apiextensions.k8s.io/ingressroutes.traefik.containo.us created
customresourcedefinition.apiextensions.k8s.io/middlewares.traefik.containo.us created
customresourcedefinition.apiextensions.k8s.io/ingressroutetcps.traefik.containo.us created
customresourcedefinition.apiextensions.k8s.io/ingressrouteudps.traefik.containo.us created
customresourcedefinition.apiextensions.k8s.io/tlsoptions.traefik.containo.us created
customresourcedefinition.apiextensions.k8s.io/tlsstores.traefik.containo.us created
customresourcedefinition.apiextensions.k8s.io/traefikservices.traefik.containo.us created
clusterrole.rbac.authorization.k8s.io/traefik-ingress-controller created
clusterrolebinding.rbac.authorization.k8s.io/traefik-ingress-controller created
Create the deployment file ‘traefik-dep.yaml’
apiVersion: v1
kind: Service
metadata:
 name: traefik
spec:
 ports:
 - protocol: TCP
   name: web
   port: 80
 - protocol: TCP
   name: admin
   port: 8080
 - protocol: TCP
   name: websecure
   port: 443
 type: LoadBalancer
 selector:
  app: traefik
---
apiVersion: v1
kind: ServiceAccount
metadata:
 namespace: default
 name: traefik-ingress-controller

---
apiVersion: apps/v1
kind: Deployment
metadata:
  namespace: default
  name: traefik
  labels:
    app: traefik

spec:
  replicas: 1
  selector:
    matchLabels:
      app: traefik
  template:
    metadata:
      labels:
        app: traefik
    spec:
      serviceAccountName: traefik-ingress-controller
      containers:
       - name: traefik
         image: traefik:v2.2
         args:
            - --api.insecure
            - --accesslog
            - --entrypoints.web.Address=:80
            - --entrypoints.websecure.Address=:443
            - --providers.kubernetescrd
            - --certificatesresolvers.myresolver.acme.tlschallenge
            - --certificatesresolvers.myresolver.acme.email=foo@you.com
            - --certificatesresolvers.myresolver.acme.storage=acme.json
         ports:
            - name: web
              containerPort: 80
            - name: websecure
              containerPort: 443
            - name: admin
              containerPort: 8080
You can use this file “out of the box” but remember to change your email address on the line
--certificateresolvers.myresolver.acme.email=
Again, we can apply this configuration with
sudo kubectl apply -f ./traefik-dep.yaml
The output
$ sudo kubectl apply -f ./traefik-dep.yaml
service/traefik created
serviceaccount/traefik-ingress-controller created
deployment.apps/traefik created
The services running
$ kubectl get service -A
NAMESPACE     NAME             TYPE           CLUSTER-IP     EXTERNAL-IP    PORT(S)                                     AGE
default       kubernetes       ClusterIP      10.43.0.1      <none>         443/TCP                                     141m
kube-system   kube-dns         ClusterIP      10.43.0.10     <none>         53/UDP,53/TCP,9153/TCP                      141m
kube-system   metrics-server   ClusterIP      10.43.55.155   <none>         443/TCP                                     141m
default       traefik          LoadBalancer   10.43.234.80   192.168.64.6   80:30889/TCP,8080:30774/TCP,443:30956/TCP   3m12s
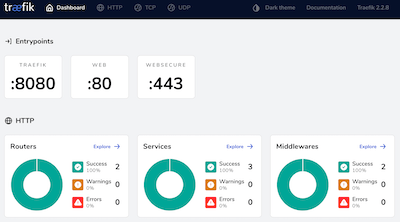
Open a browser, go to the following address : http://192.168.64.4:8080/dashboard/ to see the Traefik dashboard. It’s the cluster’s advertised IP-address.
Installing ArgoCD
Create the argocd namespace
kubectl create namespace argocd
Install ArgoCD
kubectl apply -n argocd -f https://raw.githubusercontent.com/argoproj/argo-cd/stable/manifests/install.yaml
With ArgoCD installed the next step is to get access to the CD API Server. There are three ways to do that but I chose the portforwarding option.
kubectl port-forward svc/argocd-server -n argocd 8080:443
On the kube-master we can (w)get the interface-page
wget --no-check-certificate http://127.0.0.1:8080
The result
--2020-08-14 20:48:21--  http://127.0.0.1:8080/
Connecting to 127.0.0.1:8080... connected.
HTTP request sent, awaiting response... 307 Temporary Redirect
Location: https://127.0.0.1:8080/ [following]
--2020-08-14 20:48:21--  https://127.0.0.1:8080/
Connecting to 127.0.0.1:8080... connected.
WARNING: cannot verify 127.0.0.1's certificate, issued by ‘O=Argo CD’:
  Self-signed certificate encountered.
    WARNING: certificate common name ‘’ doesn't match requested host name ‘127.0.0.1’.
HTTP request sent, awaiting response... 200 OK
The API server can then be accessed using the localhost:8080, except we are running it on a cluster within a Ubuntu multipass virtual machine.
To access the ArgoCd interface from the host where multipass is running we need to forward it also to the IP-address exposed by the virtual machine.
kubectl port-forward --address localhost,192.168.64.3 svc/argocd-server -n argocd 8080:443
On the host open a browser an go to https://192.168.64.3:8080/
Retrieve the ArgoCD password for the admin user
kubectl get pods -n argocd -l app.kubernetes.io/name=argocd-server -o name | cut -d'/' -f 2
Next steps; download and install the ArgoCd CLI, login with the password from the previous step and change the password.
On the k3s-master, get the latest version of the argocd CLI
VERSION=$(curl --silent "https://api.github.com/repos/argoproj/argo-cd/releases/latest" | grep '"tag_name"' | sed -E 's/.*"([^"]+)".*/\1/')
Install the argocd CLI on the k3s-master
sudo curl -sSL -o /usr/local/bin/argocd https://github.com/argoproj/argo-cd/releases/download/$VERSION/argocd-linux-amd64
Make the argocd CLI executable
chmod +x /usr/local/bin/argocd
Login with the argocd
argocd login 192.168.64.3:8080
Update your password
argocd account update-password
*** Enter current password:
*** Enter new password:
*** Confirm new password:
Password updated
Context '192.168.64.3:8080' updated
Document your new password …
Following the ArgoCD “Getting Started” guide you can “Create An Application From A Git Repository”
After installation we need to port-forward the ‘guestbook’ service to the k3s-master’s published IP-address.
kubectl port-forward --address 192.168.64.3 svc/guestbook-ui -n default 8081:80
Forwarding from 192.168.64.3:8081 -> 80
In a browser on your host go to “http://192.168.64.3:8081” to access the guestbook.

My findings after installing ArgoCD
Although the nodes were running when I installed ArgoCD, portforwarding did not work. When I looked at the pods on the master-node I noticed a ‘completed’ helm-install pod.
kubectl get pods -n kube-system
NAME                                     READY   STATUS      RESTARTS   AGE
metrics-server-7566d596c8-cr2cg          1/1     Running     0          35h
local-path-provisioner-6d59f47c7-dcfjm   1/1     Running     0          35h
helm-install-traefik-zslmf               0/1     Completed   0          35h
svclb-traefik-l5xbr                      2/2     Running     0          35h
coredns-8655855d6-jlt2t                  1/1     Running     0          35h
traefik-758cd5fc85-96788                 1/1     Running     0          35h
svclb-traefik-9jbt5                      2/2     Running     0          34h
svclb-traefik-fx8zq                      2/2     Running     0          34h
Removing the helm-install pod
kubectl delete pod -n kube-system helm-install-traefik-zslmf
pod "helm-install-traefik-zslmf" deleted
Checking the pods
kubectl get pods -n kube-system
NAME                                     READY   STATUS    RESTARTS   AGE
metrics-server-7566d596c8-cr2cg          1/1     Running   0          35h
local-path-provisioner-6d59f47c7-dcfjm   1/1     Running   0          35h
svclb-traefik-l5xbr                      2/2     Running   0          35h
svclb-traefik-9jbt5                      2/2     Running   0          34h
svclb-traefik-fx8zq                      2/2     Running   0          34h
coredns-8655855d6-jlt2t                  1/1     Running   0          35h
traefik-758cd5fc85-96788                 1/1     Running   0          35h
The helm-install pod is gone but the portforwarding still did not work.
I re-installed k3s, now with the extra parameter to not install traefik.
curl -sfL https://get.k3s.io | INSTALL_K3S_EXEC="--no-deploy=traefik" sh -
and re-installed it again with now without the extra parameter.
curl -sfL https://get.k3s.io | sh -
Changing the parameters of the k3s installation triggers a re-install, with the same command a re-install will not be triggered.
Not sure what was actually fixed by the re-install but after these steps the port-forwarding finally worked.
Mounting a disk with multipass
Mounting a disk (note: do not create the target mountpoint)
multipass mount ~/Projects/k3s-manual/mountpoint k3s-master:/home/ubuntu/mountpoint
Result
multipass info k3s-master
...
Mounts:         /Users/albert/Projects/k3s-manual/mountpoint => /home/ubuntu/mountpoint
...
To unmount
multipass umount k3s-master
Troubleshooting commands
Below commands were run on the k3s-master.
Finding out what runs on what port and by what process
netstat -tuanp | grep 'tcp ' | grep 8080
(Not all processes could be identified, non-owned process info
 will not be shown, you would have to be root to see it all.)
tcp        0      0 192.168.64.3:8080       0.0.0.0:*               LISTEN      11949/kubectl
tcp        0      0 127.0.0.1:8080          0.0.0.0:*               LISTEN      11949/kubectl
To check if the port-forwarding actually works
wget --no-check-certificate http://localhost:8080
--2020-08-15 18:48:56--  http://localhost:8080/
Resolving localhost (localhost)... 127.0.0.1
Connecting to localhost (localhost)|127.0.0.1|:8080... connected.
...
How healthy is our kubernetes installation
kubectl get nodes
NAME         STATUS   ROLES    AGE    VERSION
k3s-node2    Ready    <none>   2d8h   v1.18.6+k3s1
k3s-node1    Ready    <none>   2d8h   v1.18.6+k3s1
k3s-master   Ready    master   2d9h   v1.18.6+k3s1
and a step deeper
kubectl get pods -n kube-system
Investigating the argocd namespace
ubuntu@k3s-master:~$ kubectl get pods -n argocd
NAME                                             READY   STATUS    RESTARTS   AGE
argocd-redis-6d7f9df848-kwvft                    1/1     Running   0          2d9h
argocd-dex-server-675c85b57b-2vjvl               1/1     Running   0          2d9h
argocd-server-86cf69886-7h472                    1/1     Running   0          2d9h
argocd-repo-server-66784b696b-tqrlk              1/1     Running   0          2d9h
argocd-application-controller-7684cfcc66-sdj6k   1/1     Running   0          2d9h
Checking the default namespace
kubectl get pods
NAME                            READY   STATUS    RESTARTS   AGE
guestbook-ui-85c9c5f9cb-frx64   1/1     Running   0          56m
The portforwarding commands can be pushed to the background by adding an ‘&’ at the end of the command. This pushes it to the background and return with a command prompt. You can use the jobs command to get the job-number. Use fg %[job-number] to bring the job back to the foreground. A good explanation of these commands can be found here.
Some usefull commands
Shortcut for kubectl
alias k='kubectl'
See all pods, equivalent to kubectl get pods --all-namespaces
k get pods -A
Retrieve all running services
kubectl get svc
NAME           TYPE        CLUSTER-IP     EXTERNAL-IP   PORT(S)   AGE
kubernetes     ClusterIP   10.43.0.1      <none>        443/TCP   5d4h
guestbook-ui   ClusterIP   10.43.47.140   <none>        80/TCP    2d19h
Resources
The following article “How to deploy a Kubernetes cluster with Multipass” got me started but it missed a couple of features.
And there are more …
- Kubernetes Multi-Node Cluster with Multipass on Ubuntu 18.04 Desktop
- Deploy a Kubernetes Desktop Cluster with Ubuntu Multipass – The New Stack
- Build a Kubernetes cluster using k3s via Ansible
- Local K3s cluster made easy with Multipass
Conclusion
Setting up your own Kubernetes cluster is not that hard with the right tools and you wil learn a lot along the way.
The next steps are probably automating the manual steps with Ansible. This will make it easier to deploy to my Pi cluster.