Updated on 23 October 2020 - Better solution described in Persistent NFS mount points on macOS.
Updated on 5 May 2020 - Updating the OS removes the added lines from the file ‘auto_master’
With each OS update the ‘auto_master’-file is reset to its default. The ‘auto_nfs’-file which mounts the NFS volume still exists in the /etc directory and is untouched.
This is a quick-fix to add the missing line to the ‘auto_master’-file.
Create the file ‘check_auto_master.sh’ and add the following lines:
if ! grep '/etc/auto_master' -e 'auto_nfs'; then
  echo "/-\t\t\tauto_nfs" >> /etc/auto_master
  automount -cv
fi
Make the file executable; chmod +x check_auto_master.sh.
Execute the script with sudo rights: sudo ./check_auto_master.sh.
The script adds the missing line and mounts the volumes.
Updated on 21 October 2019 due to breaking changes in macOS Catalina 10.15.
The two breaking changes in the 10.15 release:
- A reset of the file
/etc/auto_master, removing previous modifications. - The base mount-path changed from
Users/to/System/Volumes/Data/Users/
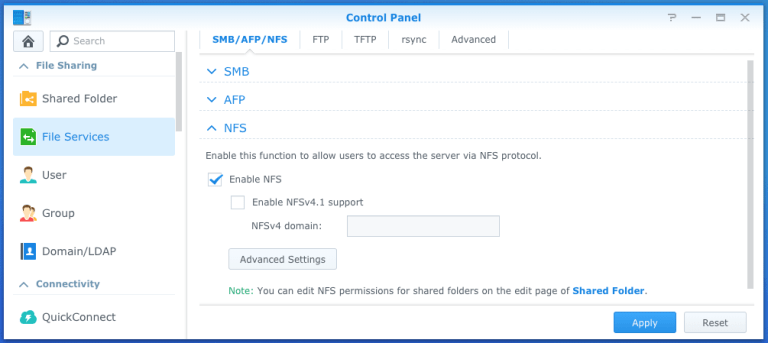
Setup NFS on Synology
Enable the NFS protocol
Go to your Synology and enable the NFS protocol.
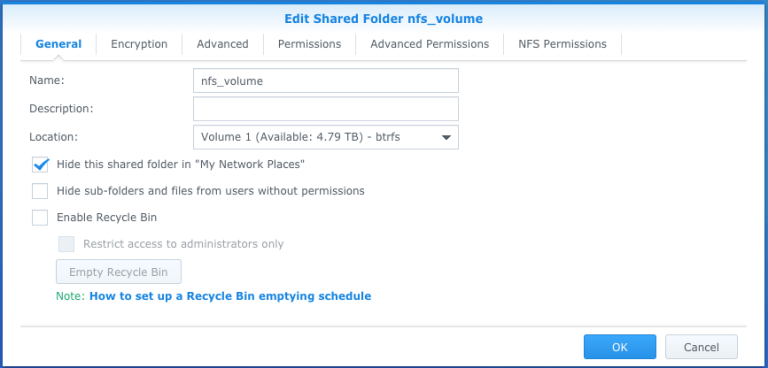
Hide the shared folder
Go to the shared folder you want to access via NFS and check the “Hide this shared folder” checkbox.
Set NFS Permissions
Go to the NFS Permissions tab and set the rights as shown below.
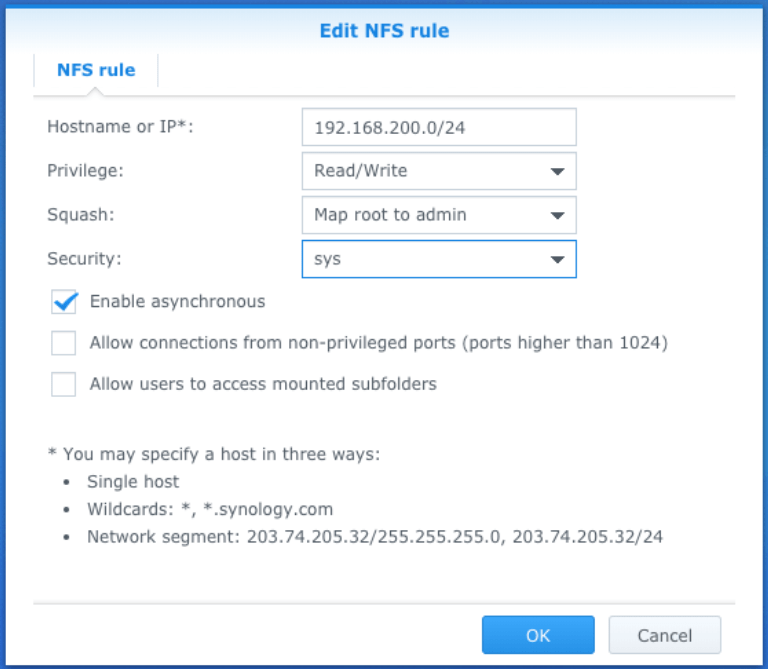
Read Assigning NFS Permissions for DiskStation Manager for more info.
Verify the volume is mountable
Verify that “nfs_volume” is exported by your Synology:
$ showmount -e synology_nas.local
Exports list on synology_nas.local:
/volume1/nfs_volume    192.168.200.0/24
Try to mount the volume manually:
sudo mount -t nfs -o resvport,rw synology_nas.local:/volume1/nfs_volume /Users/tisgoud/nfs_volume
Check if the volume is mounted:
df -H
Verifiy the volume is writable
Check if you can write to the volume:
touch /Users/tisgoud/nfs_volume/test{1..3}.txt
The map icon should also change into a shared folder icon.
![]()
In the next step we will automount the volume, so for now unmount the volume.
sudo umount -h synology_nas.local
Configure the automount on the NFS client
To mount the NFS volume at boot-time we have to add it to the “Automounter master map”.
Edit “/etc/auto_master”
The “Automounter master map” can be configured via the file “/etc/auto_master”. Open the file as administrator.
sudo nano /etc/auto_master
Add the “auto_nfs”-line to the end of the file. This will try to auto-mount your nfs drive.
#
#
# Automounter master map
#
+auto_master       # Use directory service
/net               -hosts       -nobrowse,hidefromfinder,nosuid
/home              auto_home    -nobrowse,hidefromfinder
/Network/Servers   -fstab
/-                 -static
/-                 auto_nfs     -nobrowse,nosuid
Create “/etc/auto_nfs”
Mentioned as one of the breaking changes, the base mount-path changed changed in macOS Catalina 10.15.
| macOS version | base mount-path |
|---|---|
| pre-Catalina | “Users” |
| Catalina | “/System/Volumes/Data/Users” |
Create the file “/etc/auto_nfs” and use the template below as an example for your settings. Replace [base mount-path] with the value from the table above.
[base mount-path]/username/nfs_volume -fstype=nfs,noowners,nolockd,resvport,hard,bg,intr,rw,tcp,nfc,rsize=8192,wsize=8192 nfs://192.168.200.200:/volume1/nfs_volume
[base mount-path]/username/nfs_volume, the location where you want to mount the volume. Change/username/nfs_volumeto match your user name and the location where you want the volume to be visible in your local file system.-fstype=nfs, the filetype to mountnoowners,nolockd,resvport,hard,bg,intr,rw,tcp,nfc,rsize=8192,wsize=8192, the mounting parameters where the parameter “resvport” was required to connect to the NFS volume on my Synology.nfs://192.168.200.200:/volume1/nfs_volume, the location of the NFS volume
Set rights on “/etc/auto_nfs”
Set the proper rights on the file “/etc/auto_nfs”.
sudo chmod 644 /etc/auto_nfs
Mount the NFS volume.
Use the following command to initiate the automounter:
$ sudo automount -cv
automount: /net updated
automount: /home updated
automount: /System/Volumes/Data/Users/tisgoud/nfs_volume updated
automount: no unmounts
With that last step your NFS volume should be mounted.
Resources
I used the following resources for the NFS-part:
- GitHubGist: L422Y/osx_automount_nfs.md
- nixCraft: macOS X Mount NFS Share /Set an NFS Client